Basics – Continue to work after a reboot or in another place – Working with archives – Ramdisk configuration – Security features – Error correction – Usage scenarios
Bond Disc guards files on your PC. It is a secure archive manager with a built-in ramdisk that provides you instant access to the currently selected archive. It gives you full control of file security whereas by default this is managed by the OS with all the vulnerabilities this entails.
Bond Disc guards your files against unauthorized access, safeguards your files against defects, and organises your data. It saves you time by relieving you of the tasks to maintain file security individually, to backup and check the integrity of your files, and to copy files individually to a notebook or memory stick.
The ramdisk volume acts as your home folder, secure and mobile for easy access anywhere. While the individual components and technologies exist in the market, Bond Disc combines these into a single streamlined product that saves the user a good deal of time every session while it secures the data professionally.
The Bond Disc installer is a small Windows Installer file, roughly 800 KB in size. You can obtain the installer from www.bonddisc.com, or put it on a memory stick with your archived files for easy installation anywhere. The installer supports nearly every Windows platform since Windows XP (with service pack 2).
If you double-click on the Bond Disc installer, you are asked by Windows UAC to authorize the installation and presented with a license agreement. For private usage no license fee is required and you can use the Bond Disc application free of charge. Once you have accepted the license, the Bond Disc secure ramdisk is installed and the application is launched.
On successful installation you are presented with the ramdisk volume ready for immediate access and a short online help introduction how to get started.
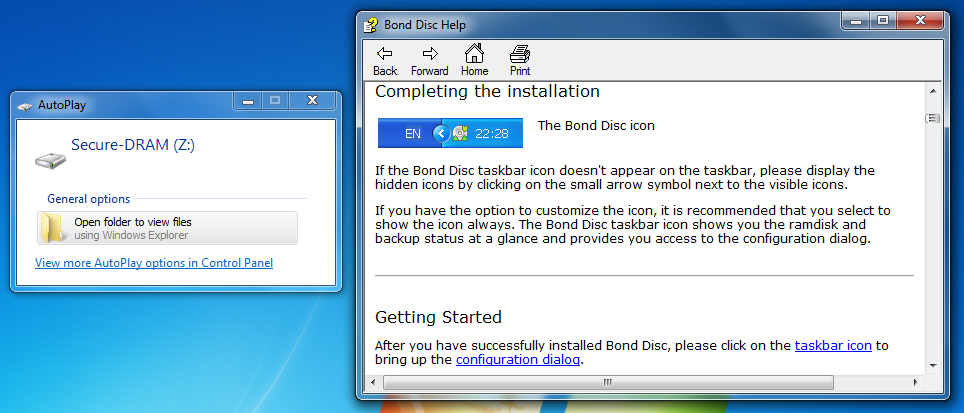
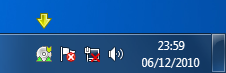
The Bond Disc application installs a small icon into the taskbar tray. Typically you need to click the small arrow next to the other tray icons and choose customize. It is recommended to enable the notifications from the Bond Disc tray icon and show the icon always.
If you click on the Bond Disc tray icon you are presented with the configuration dialog.
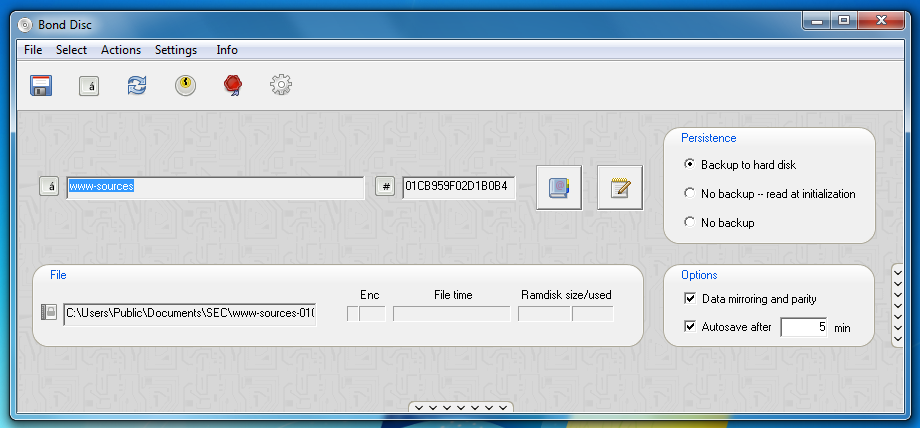
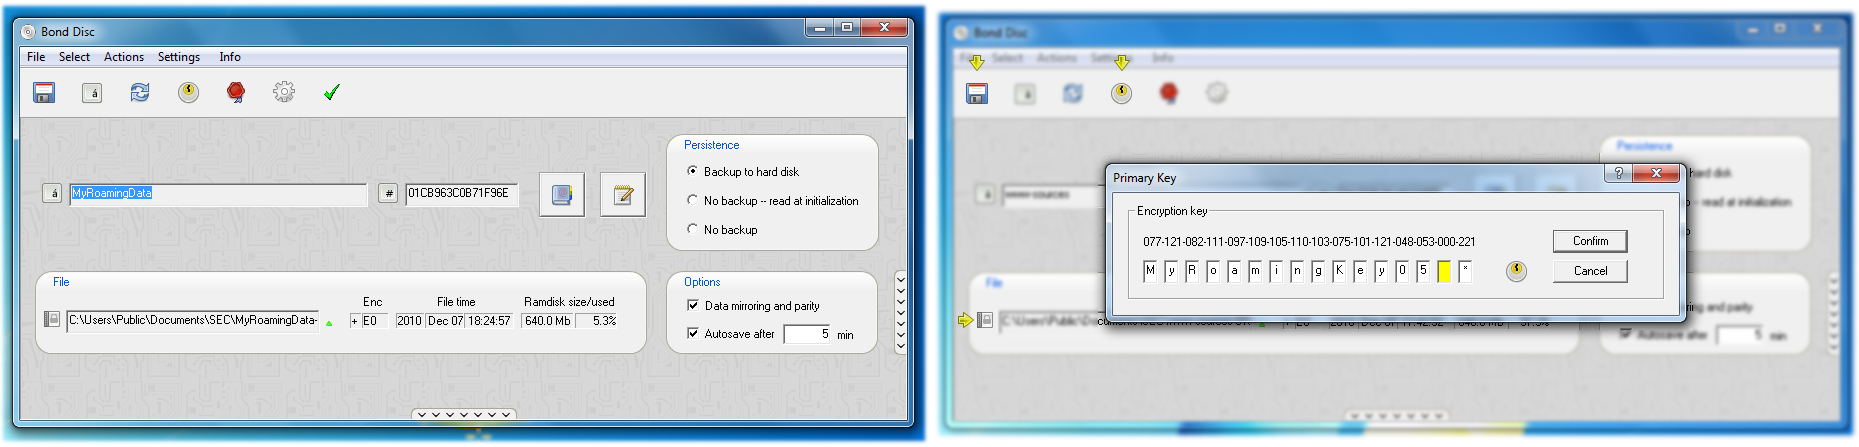
If you just wish to use the ramdisk, the default settings are sufficient and you are ready to go. If you wish your documents on the ramdisk to remain confidential, set the encryption mode to encrypted. This will prevent your documents from being written into a memory dump, in the case that your PC or notebook enters sleep mode.
To prevent your documents from being written to hard disk, leave the persistence setting at no backup.
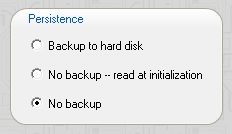
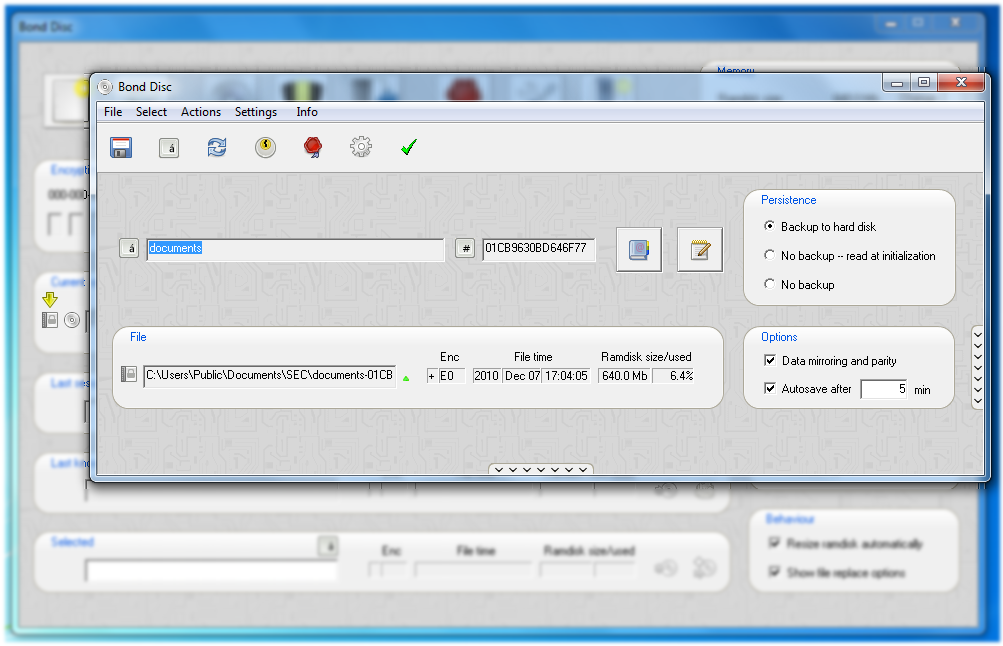
On the other hand, if you wish to use the ramdisk persistently, i.e. to work with the files on it now and to continue working after the next reboot or in another place, you can choose backup to hard disk. You may also wish to give the backup of your work a distinctive filename. To do this you can click on the stylized keyboard button.
It is sufficient to enter a filename only. The filename suffix is added automatically.
The next thing to consider is whether you want to protect your work from unauthorized access. If so, set the encryption mode to encrypted as explained above. In this case, before a backup can be written to hard disk, you need to set a valid encryption key.
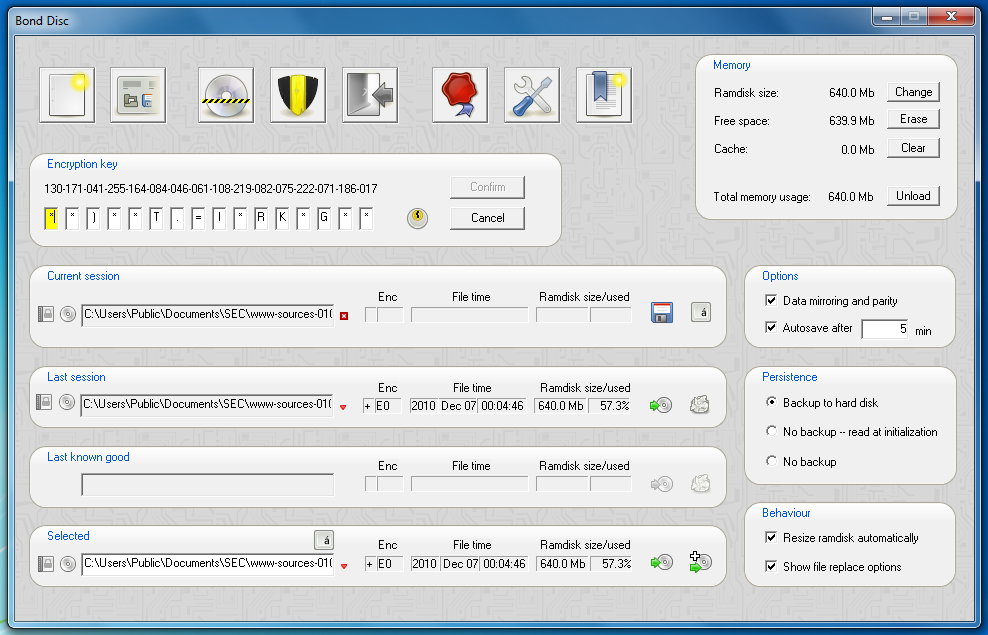
After you have entered a valid key, you will see the Bond Disc taskbar icon change to reflect your setting.
Once you start working with your files on the ramdisk, you will note that the taskbar icon marks the ramdisk content dirty.
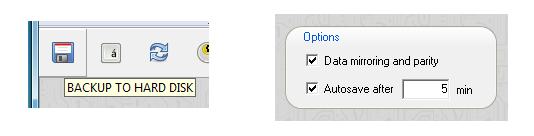
This signals changes to the content on the ramdisk that have not been written to a backup. You can trigger a backup manually or set up autosave, which will save your work periodically. An autosave interval of 5 minutes is recommended, that is any changes you make will be backed up no later than 5 minutes after they happen.
After your work has been backed up, you will note that the taskbar icon displays a green status at its lower right. This is the backup status.

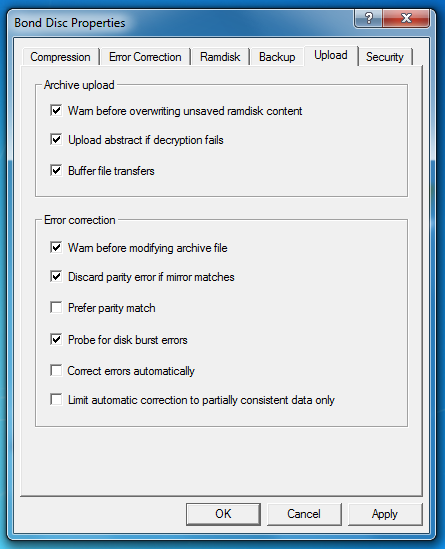
Above the autosave option is the data mirroring and parity option. If you choose to have your backup encrypted, this option is highly recommended. Although this technically triples the file size, the built-in bzip2 compression normally more than offsets this increase, so that your backup still consumes less space on hard disk than the individual files on the ramdisk would. The benefit of the data mirroring and parity option is that a backup can be recovered even if the storage media has been damaged.
In persistent mode the content of the ramdisk is backed up at system shutdown and restored after a reboot. If the content is not encrypted, this happens automatically. In the case that the content is encrypted the proper encryption key needs to be supplied before the content can be restored.
You can enter the key required by calling up the control center. Right-click on the Bond Disc tray icon and choose control center or click on the control center button in the configuration dialog.
A backup restoration error because of a missing encryption key is shown with a small red square in the current session box.
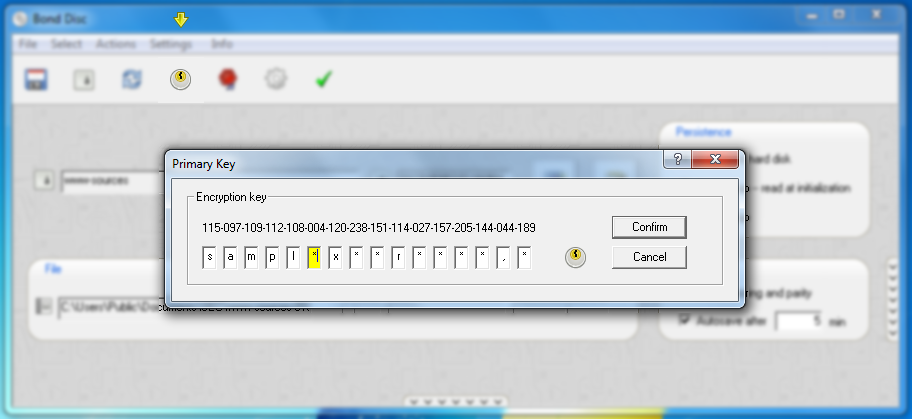
Above the current session box is the encryption key box. Once you have entered the key and clicked on the confirm button, the backup is restored automatically.

The encryption key displayed in the box is initialized randomly. You can either type the key with the keyboard, which is discouraged for security reasons, or use the cursor and page up/down keys to modify the key characters. The key characters are drawn directly and are not submitted to the Windows messaging system. If you enter the key with the cursor and page up/down keys it cannot be tracked.
If you enter a wrong key, you receive an error message.

If you enter an encryption key it is confirmed with a small green square. This icon signals a newly entered encryption key. If the icon changes to a brighter olive green, it signals that the key has been verified to decrypt the backup.
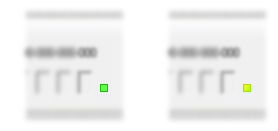
The last session and last known good boxes display the filename of the backup that was attempted to read and/or the last successful read.
A red icon to the right of the filename marks an error, a green icon success.

You can trigger the restore from a specific backup file by clicking on the upload button. A click on the discard button, removes the reference to the backup file, i.e. prevents it to be read automatically. The discard operation can be undone. Discarding the reference in the last session box enables access to the last known good file operations. If the last session reference does not exist, the last known good is choosen to be read automatically.

In the selected backup box you can specify a backup of your choice by clicking on the choose button.

In addition to the upload button, you also have the option to add the files from the backup to the current ramdisk content by clicking on the icon with the white cross.

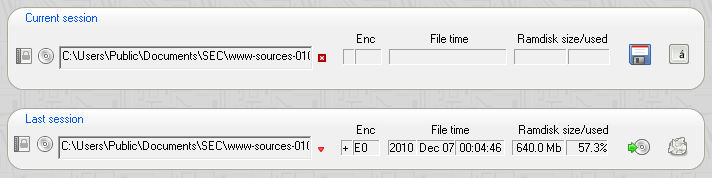
The behaviour box contains two options. The resize ramdisk automatically option resizes the ramdisk if the backup being read is too big for the current ramdisk.
The show file replace options brings up a small dialog that allows you to choose which files are replaced whenever you add files from a backup to the ramdisk.

This is useful for synchronizing the ramdisk content with a backup from a mobile device or notebook. Select the replace if newer option to synchronize the files based on their most recent modified time stamp.
If you wish to upload a backup but do not want to replace the current encryption key, you can click the read-only key button.

If you click this button again or click the cancel button, the read-only key editor is closed. The upload and add files buttons change their color to signal that the read-only key will be used. You can toggle the icon to the right of the key to set whether the read-only key will be discarded after the backup has been read or made the current encryption key.

A click on the new archive button provides a clean slate, i.e. a new backup filename and empty ramdisk.

An alternative shortcut to specify an encryption key after reboot is to click on the Bond Disc tray icon and to choose the key editor in the configuration dialog.
This key editor works in the same way as the key editor in the control center. Once you have specified a key, the backup is restored automatically to the ramdisk.
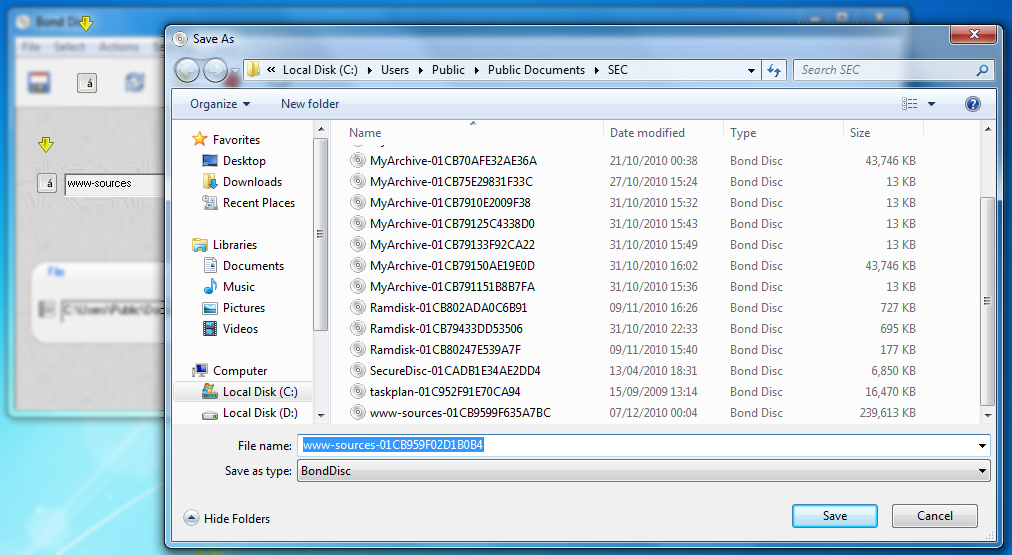
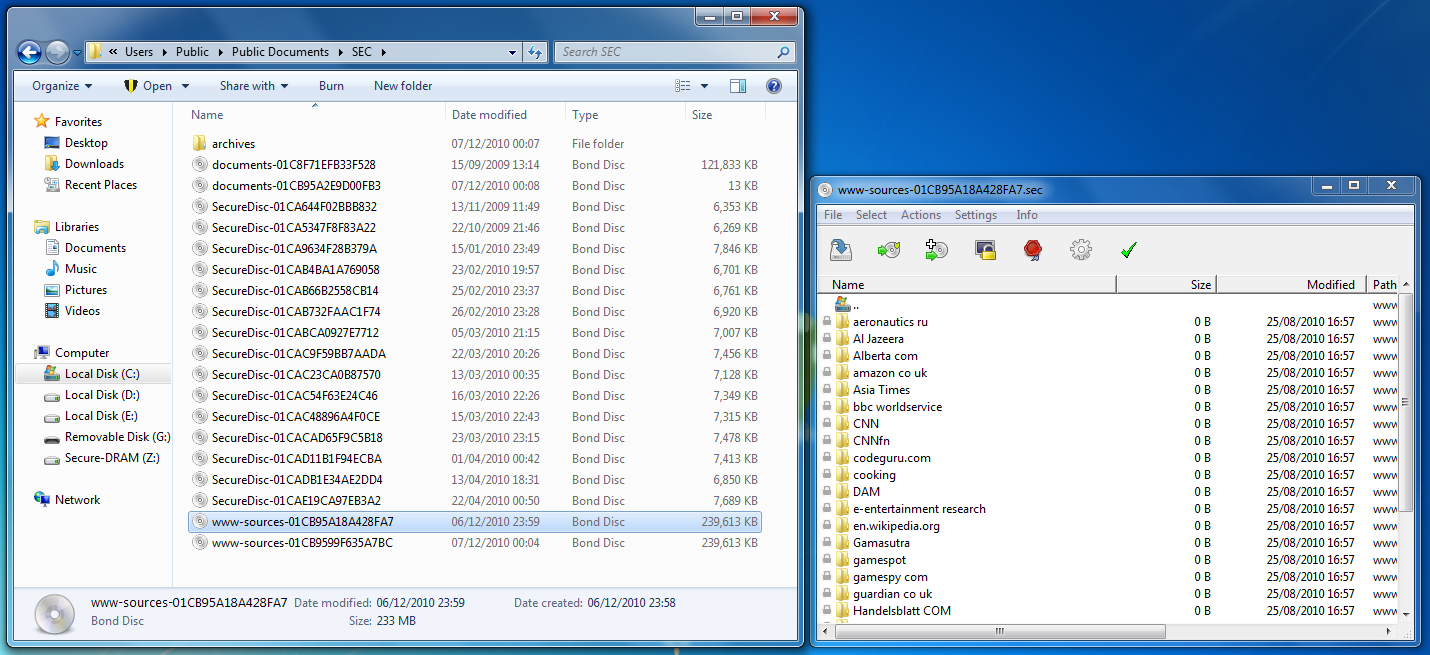
Each backup of the ramdisk content is stored in an archive that can be accessed independently. The archive has the file extension .sec, the filename you have specified in the configuration dialog and a session suffix. The session suffix is a 16 digit hexadecimal time stamp that has a 100 nanoseconds resolution; i.e. it is highly unlikely that two Bond Disc archives will have the same long filename. The backup mechanism typically creates a list of archives ordered by their session suffix located in a single folder.
In general the archives that are saved at system shutdown or manually by the user are preserved. The autosave function preserves only the most recently autosaved archive. This leaves an archive trail in the backup folder that contains one archive per session plus the archives saved manually. A double-click on an archive in the Windows Explorer opens the Bond Disc secure archive manager.
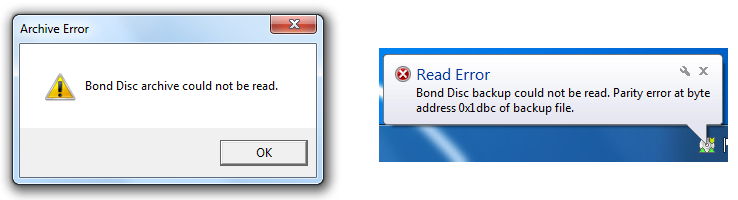
This simple double-click on an archive file also works as an integrity check for archives that for instance you have copied to a memory stick or notebook. If the archive has parity and the reading of the archive passes the parity check at the beginning, you are guaranteed that your data is accessible.

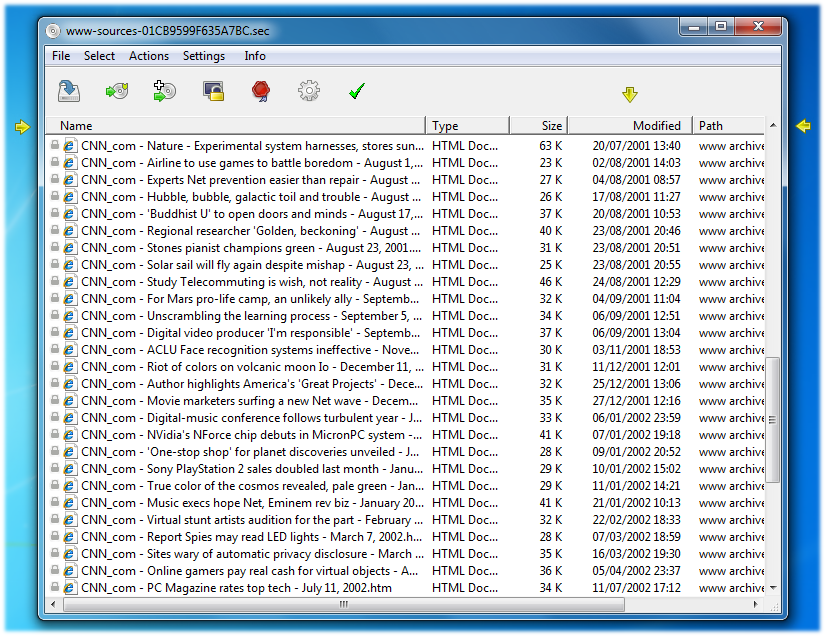
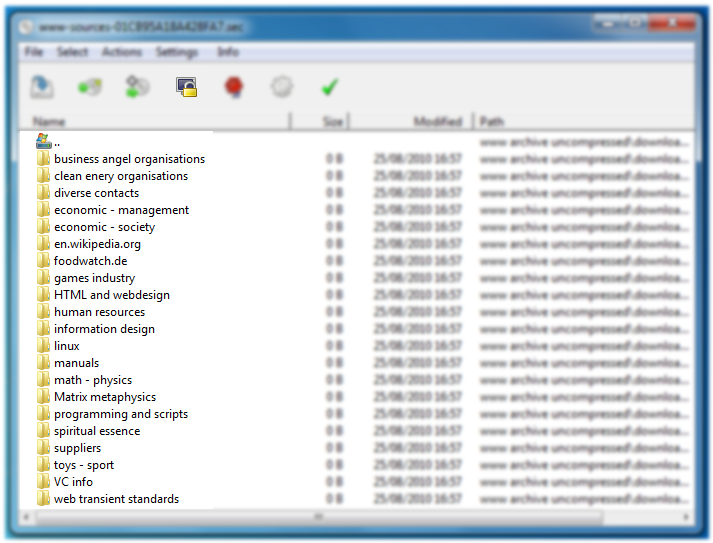
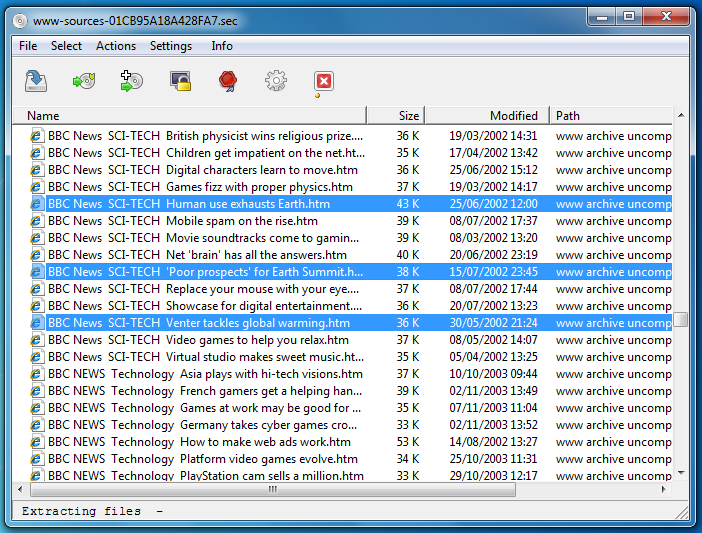
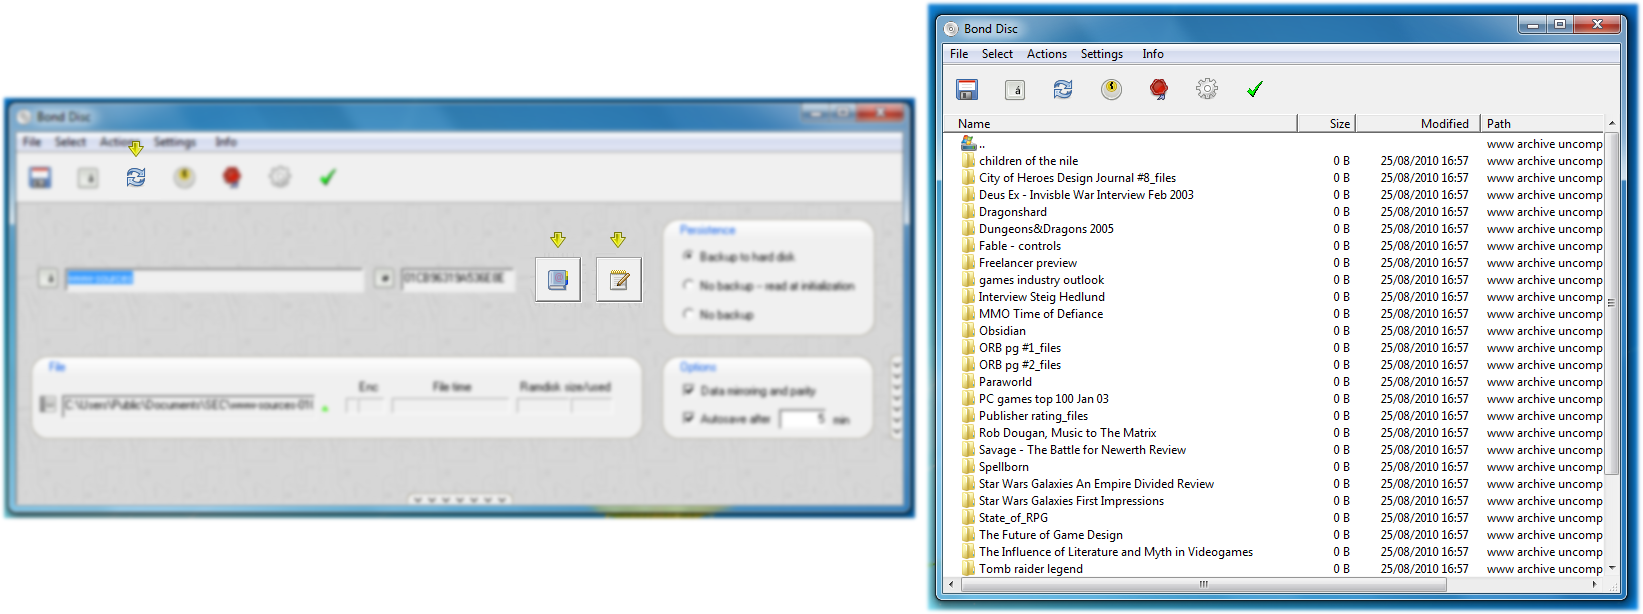
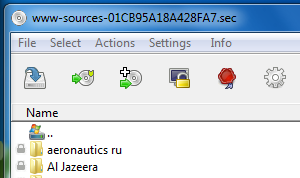
The archive manager displays the files in the archive, i.e. the files that were included in the backup of the ramdisk, if the archive is public (not encrypted) or the archive directory is public. Without the proper key the archive items are shown with a small lock symbol to the left to indicate that they inaccessible. You can navigate the archive by double-clicking on folders and navigate backwards by double-clicking on the double-dot entry in a folder which takes you to the parent folder. You can sort the archive items by clicking on the header columns. You can resize and reorder the header columns by dragging a column or its border.
You can get access to encrypted files in the archive by clicking on the lock symbol. This opens the key editor for a key that is only used for the opened archive.
Once you have unlocked the archive the lock symbols to the left of the archived files vanish. You can directly access an archived item by double-clicking it, which opens the content with the program registered with the Windows shell. If it is an executable file, the program is run.
You can select files by drawing a group box with the mouse or by clicking on a file. If you hold the shift key, a group of files is added. If you hold the control key individual files and/or directories are added or removed from the selection. The selected files (or a single file if none is selected) can be dragged and dropped to other locations on the desktop.
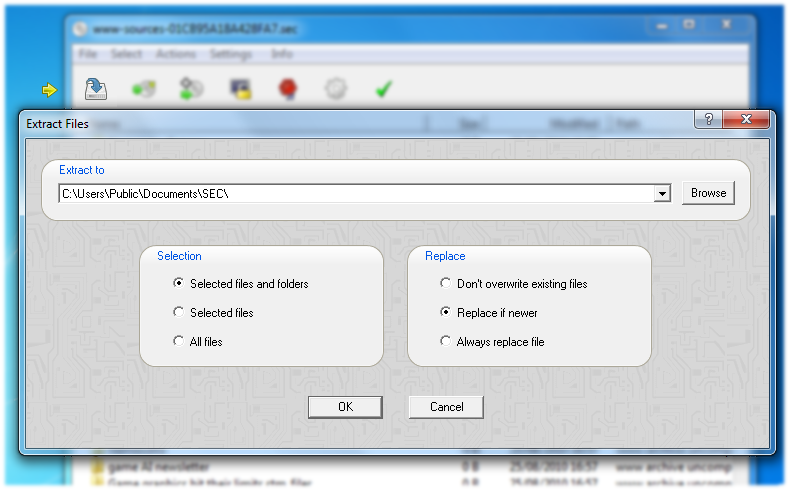
In the Settings menu you can choose between two modes: to show all files in the archive in one list, or alternatively (the default) in a hierarchical directory with folders that can be navigated. You can swap between these views to suit your needs and taste. This mode also affects how files are extracted from the archive, either by drag & drop or by the Extract dialog. If the archived files are shown in a single large list, the parent directories of an archived item are created in the drop location, otherwise the file is copied directly.
As an alternative to drag & drop you can click on the Extract button. This gives you additional filtering options for the copy operation.
You can also add files from the archive to the ramdisk or upload the archive to the ramdisk, which replaces its current content. If you upload an encrypted archive, you can select to replace the current encryption key with the archive key. If this option is active, the upload archive button has a small green shield in its upper right corner.

You can also access the archive manager by clicking on the encryption mode icon to the left of an archive in the control center. This applies to the last backup, last known good and selected backup. If you click on the encryption mode icon of the current session, it brings up the current session configuration dialog.
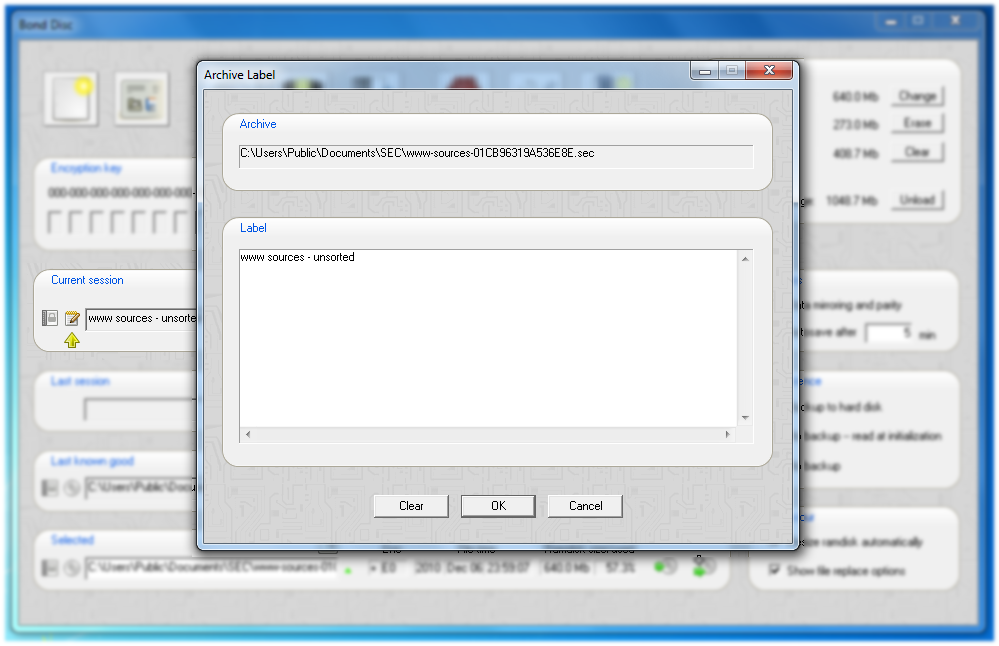
You can click on the swap view button to switch between the configuration dialog and the content currently available on the ramdisk. If you click on the abstract or label button, you can select either a new abstract or edit the label respectively.
In the abstract dialog, you can specify a file that is not saved encrypted. This is useful to provide a user with a manual, demo, setup, readme or abstract that describes the content in detail.

The label editor can be used to describe the content in plain text only. The text is limited to roughly 6,000 characters.

You can inspect an archive's abstract and label from the control center. If you click on the icon to the right of the encryption mode, you can toggle between filename, label and abstract. If you click on the short extract from the label, the full label text is displayed in the label editor.
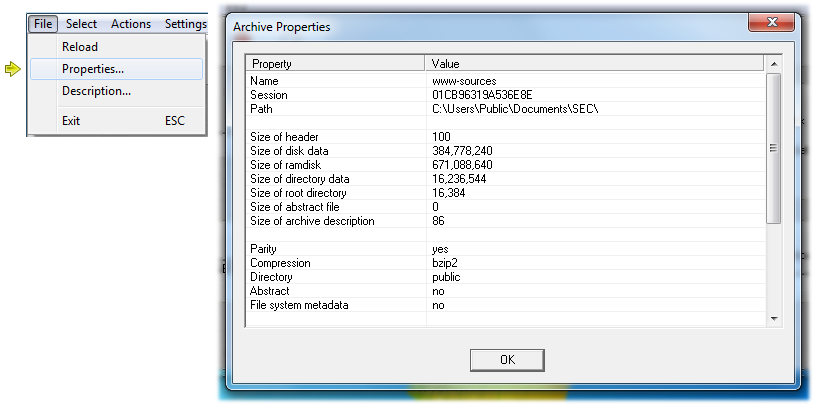
A click on the Properties menu item in the File menu, shows the archive properties, e.g. its size, creation date, encryption properties, compression, applied seals and other.
Most of these archive properties can be adjusted in the configuration dialog, if you click on the small arrows at the side or bottom. This expands the configuration dialog temporarily.
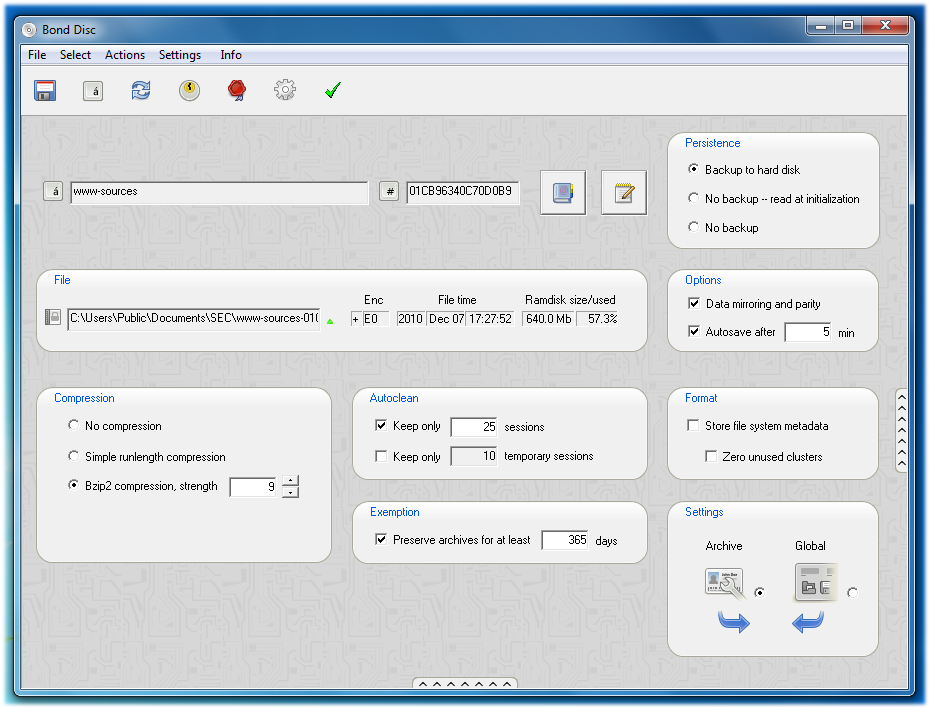
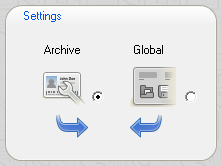
These advanced options can either be set individually for each archive, or maintained as a global application default. The Settings selector box determines which parameter set applies. The settings selected are stored with an archive backup.
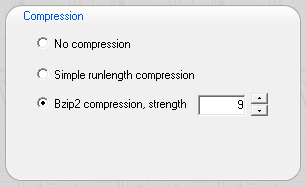
The compression strength can be adjusted to either favour disk space (higher settings) or backup speed (lower settings). Depending on the type of your most common documents and files, a considerable speed-up of the backup process can be achieved for a trade-off of only a small amount of disk space.
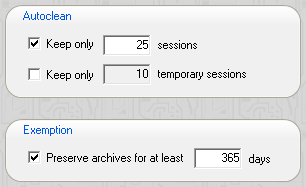
The maximum archive limit and exemption boxes give you control over how many archives with a given name are preserved. You can limit the number of backups and you can exempt archives that are more recent than a specified threshold from the auto-clean. The settings for temporary archives, i.e. backups that are deemed intermediate by the application, normally do not need to be changed.
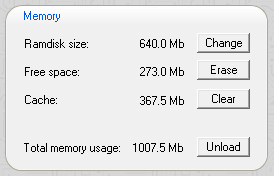
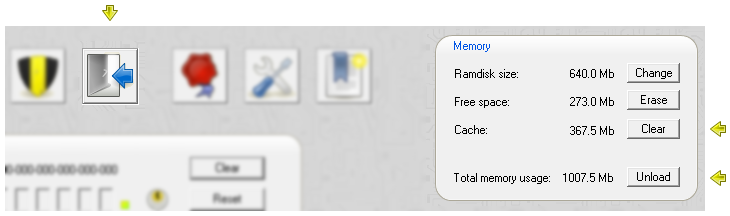
You can configure the ramdisk in the control center. The memory box at the top right shows the current ramdisk size and the free space remaining. The Erase button deletes the content on the ramdisk. The Unload button disables and frees the memory used by the ramdisk. You need to reload the ramdisk or an archive to restore operation.
You can change the ramdisk size by clicking on the Change button. Valid ramdisk sizes range between 1 MB and 640 MB. Files on the ramdisk are preserved during the resize operation. The resize ramdisk automatically option pertains to the upload of another archive. If the ramdisk is to small to hold the contents of the archive, it is resized automatically.

The cache is used to speed up archive load times, if you access an archive multiple times. The cache holds those archives that you use more freqently and that have longer reload times, for example if decryption or decompression is expensive. The cache size can be limited by setting the backup pool memory.
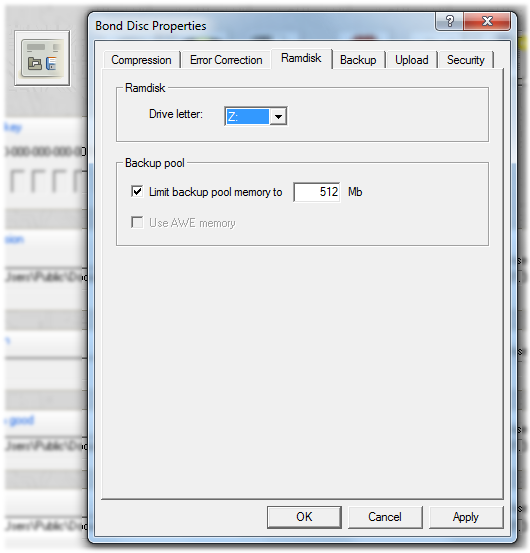
This setting dialog is available from the control center. You can also assign a new ramdisk drive letter in this dialog. The ramdisk content is preserved during this operation.
The built-in key editor is secure. It does use its own drawing routines to bypass the Windows messaging system. Each time you open the key editor it is preset with a random key. If you change the key characters with the up/down cursor keys or page up/down keys for faster change, the key you enter cannot be tracked by keyloggers. You can switch between the key characters with the right and left cursor keys or the tab and shift tab keys.

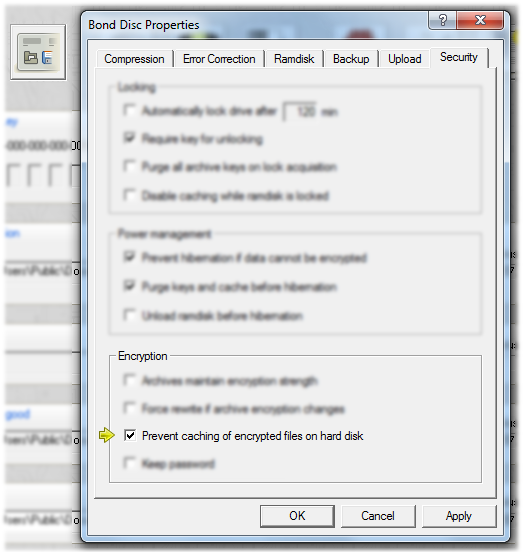
The hibernation manager guards ramdisk content marked for an encrypted backup and prevents the ramdisk content to be written to a Windows memory dump. If a valid key is available, the files will be encrypted and the key cleared from memory before the notebook enters the sleep mode. In this case you will need to reenter the key before you can restore your data. This protects against theft and loss.
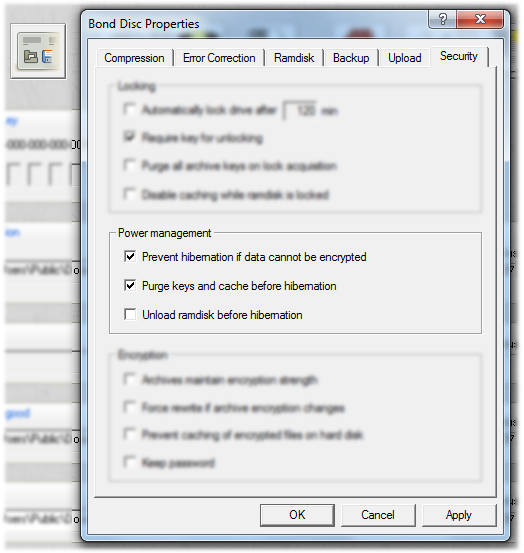
The power management options in the security settings allow you to modify the behaviour of the hibernation manager. You can also opt to unload the ramdisk before hibernation to ensure that no data on the ramdisk is written to a memory dump even if the ramdisk content is not marked for an encrypted backup.
You can lock the ramdisk content from the control center. This prevents all access to the ramdisk as long as it remains locked.

Pressing the lock button once locks the ramdisk. To unlock the ramdisk, you are required to enter the proper key, if any is required. If you do not need access to the locked content, you can simply proceed by uploading another archive or erasing the current ramdisk content. Note that you can save an encrypted backup while the ramdisk is locked.
You can configure the ramdisk to be locked automatically after a given time. You can also set whether security sensitive data is purged on lock acquisition, and whether a key is required to unlock the ramdisk.

It is possible to restrict access to the ramdisk volume to a given user or to a limited set of applications with the proper privileges. To this end Bond Disc Security offers a professional filter driver that intercepts all file system requests to the ramdisk. This filter driver can be configured to serve almost any security needs, e.g. it can limit access to the ramdisk to a specific UAC account or require the presence of a security card or preconfigured memory stick with clearance permissions.
You can purge the encryption keys and cache by clicking on the Purge button in the control center. You can clear the cache manually by clicking on the Clear button in the memory box. If you leave your PC unattended for a while, it is recommended to unload the ramdisk to ensure that no confidential data remains as a potential target for other users on the PC.
An archive can be sealed manually. Each seal increases the encryption strength of another 128-bit key. An archive can only be decrypted if all seals have been removed, which allows peers and partners to lock content until all parties clear access.
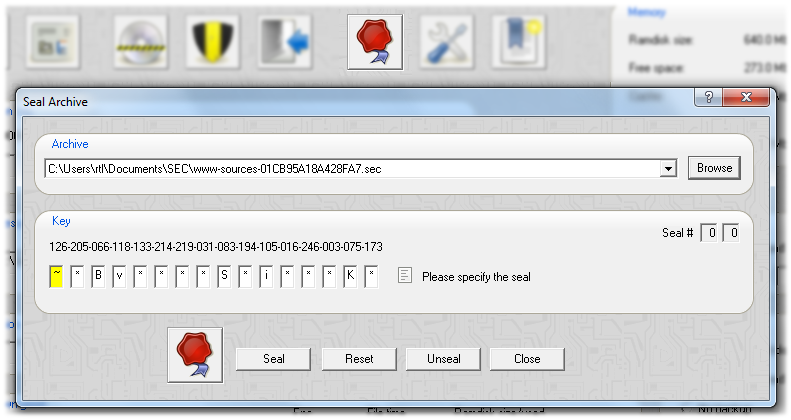
Bond Disc Security offers additional professional services to seal automatically all archives with a department seal or individual security badge and to place these archives into an organisation wide repository. This allows for a central and secure data storage into which every member can log information but access is limited on a need-to-know basis.
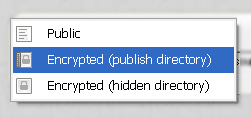
The secure archive manager limits access to files to authorized personnel only. The archive directory can either be hidden or public. If the directory is public a user can browse the archive directory and determine which files are stored without entering a valid encryption key.
Once the user enters the necessary key(s) the archived items become accessible. A single double-click on an archived item opens its content with a suitable application. For this to work the archived document needs to be written to a cache. By default, if the archive is encrypted this item is cached on the ramdisk only to prevent leaking of the information to the hard disk.
If the parity check of an archive fails you receive an error message.
You can inspect an archive with the built-in error correction. You can simply determine the errors or have them automatically repaired.
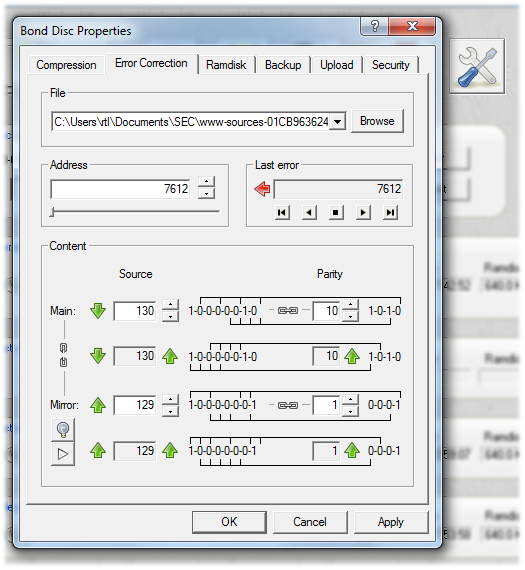
The manual and automatic error correction can be configured for different needs. By default, the error correction is configured to detect and repair burst errors on defect storage media.
Bond Disc makes roaming with personal data and documents considerably more easy. First, it protects your personal data as soon as you put them on the ramdisk. It is entirely feasible to place your credit card details and account details, passwords and other confidential information into a confidential document. Documents needed for traveling or work while roaming can be added. All you need to do, is to set the encryption mode, enter a valid key and save the content to a backup archive.
Simply copy the archive to a memory stick and/or notebook and perform a double-click on the copied archive to verify that the data is complete and intact.

If you copy the Bond Disc installer, a small file of roughly 800 KB, as well, you can restart working with your secured documents at any place where you have access to a Windows PC or notebook. Install Bond Disc, upload your archive to the ramdisk, review documents or make changes, save the archive, and copy the updated archive to your memory stick again. If you travel and lose the notebook or memory stick, no one will have access to your personal data. If you pass through custom checks that scan your data, you can answer with a smile.
The ramdisk is big enough to hold all the files for a software development project. It is straightforward to do all development work with the source files held on the ramdisk. Building the software is considerably faster, and with the proper configuration of the autosave feature any changes are backed up to a hard disk within a couple of minutes. If you also set up encryption, your work is secure.
You can easily make a backup copy at the end of your work session and transfer the archive to a memory stick. A simple double-click on the copied archive verifies that the data is complete and intact. You can easily continue working in another location or exchange files with colleages. It is easy to synchronize the content on the ramdisk with files from an archive. You can choose to add files only if they are more recent than existing ones.
The Bond Disc archives also double as a small version control system. Typically after each session, another archive is added to your backup folder. If you need access to an earlier version of a file, you can simply open an archive with the required time stamp. You can always add another archive to your backup folder by clicking the write backup button, for example when you reach a small milestone or have finished a routine. These archives will be preserved in your backup folder.
Bond Disc Security offers additional professional services to integrate the security features of Bond Disc into a corporate network and/or organisation wide document management. All personnel can work with confidential documents that are never written directly to a hard disk but are maintained on a ramdisk. Any backup can be written directly to a department or organisation wide repository, automatically sealed and stored securely.
Reversively, access to the information in the repository can be granted on a need-to-know basis. If the user has the proper security clearance, the required data is restored to a secure ramdisk in the user's location.
Bond Disc Security does not rely on operating system specific features, that are commonly known to hackers, and does not have the same weaknesses and security issues that plague todays IT infrastructure. Instead all data is maintained securely and only accessible with the proper security clearances. The elevated security of Bond Disc makes these features also available for sharing confidential data beyond internal networks and guarantees security for data exchange on the world wide web.